How Windshield Replacement Installation Works

Many modern cars have cameras and sensors behind the windshield that enable features like lane-keeping assistance, adaptive cruise control, and collision prevention. These sensors and cameras need to be recalibrated after windshield repair or replacement.

This is an easy step to miss and one that some technicians skip. Windshield Replacement In Ocala applies a urethane primer to the pinch weld and frame perimeter.

windshield repair

When a crack or chip in your windshield occurs, it must be repaired immediately. Left unattended, these small blemishes can expand to form “spider web”-like cracks that compromise the structural integrity of your vehicle and can impair your driving visibility.

Windshield replacement is a complicated process that requires professional installation to ensure your safety and the quality of the new glass. It’s important to choose a reputable auto shop and a glass that is certified by the Department of Transportation (DOT) as meeting federal standards for safety glass. It’s also a good idea to insist that your installer use OEM or original equipment equivalent auto glass rather than aftermarket window glass.

Before a technician can install your new windshield, they must prepare the area and remove any existing adhesive or sealant holding it in place. Once the frame is empty, a primer is applied to provide a clean surface for the urethane adhesive to adhere.

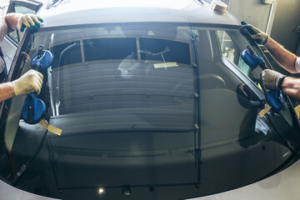
Once the primer is dry, the technicians will apply a bead of urethane to the perimeter of the frame, making sure it’s level and continuous. Then, the windshield is set into place using suction cup window holders.

If your car has ADAS, such as cameras that detect lane departures or forward collision risks, ask your installer to recalibrate those sensors when the new windshield is installed. If not properly calibrated, these systems can react too quickly or fail to warn you of dangers that are actually present. This can lead to dangerous road conditions or even accidents. This is an important step that most professional automotive body shops will perform for you.

If your windshield is cracked or damaged, it may be time for a replacement. While small chips or dings can be repaired, larger cracks or spider-web damage that compromises your vision require a full replacement. Once the technician assesses the damage and determines if it needs repair or replacement, he will begin the removal process by covering the vehicle’s exterior with protective tape and placing towels on the dashboard and over the hood to protect against possible glass shards during the replacement.

Once the protective tape and towels are in place, the technician will start by removing the rearview mirror and windshield wipers, as well as the rubber gasket around the base of the windshield. Then, he will use suction cups to remove the old windshield and set it aside.

This is one of the most important steps of the entire process. We know that if this step is skipped, it will result in rust underneath the new urethane, which can cause leaks and other problems.

During this step, the technician will also be able to see if the windshield has any water leaks or damage from the pinch weld (an area on the front of the car where different metal components are welded together for structure). This can cause ghosting or double images when driving in certain conditions.

Then, the technicians will start to prepare the new glass for installation. This includes cutting it to size and removing garnish moldings attached to the glass. This is an extremely important part of the replacement as it ensures that the new windshield is properly fitted and will be a perfect fit for your vehicle.

A primer is a base coat for paint. It provides a smooth surface for the color to bond to and blocks any imperfections in the original coating. Primer also helps protect the surface from moisture and stains. There are different primers for different needs. For example, some are water-based, while others are oil-based. Some are formulated for interior or exterior use. Some primers emit dangerous fumes, so it’s important to wear a mask when using them.

When a new windshield is installed, technicians will apply a primer to both the glass and the vehicle’s frame. They do this to ensure zero contamination before sticking the windshield, adding a layer of protection against the elements.

If this step is skipped, the windshield could crack. A cracked windshield is a safety hazard, especially when driving on the highway. Loose debris from the road, like gravel or rocks, can fly off the car and slam against your windshield at high speeds.

In addition, a poorly installed windshield may affect your vehicle’s sensors. If you have advanced driver assistance systems (ADAS), such as lane departure warnings or blind spot monitoring, a cracked windshield can throw off the calibration. This could leave you vulnerable to a collision or in the wrong lane.

Once the technician has applied the primer and your new windshield is firmly set, they’ll dry it and let it sit for a few hours. It’s best to keep your car out of the rain until the adhesive has fully cured, which can take up to a day. You should also avoid slamming the doors while the windshield is still healing, as it can dislodge the window.

Urethane is a tough, flexible polymer-based adhesive in the auto glass industry. It is also found as a coating, sealant, and thermal insulation material. It is black and has a medium viscosity, easily applied with an electric or air-powered caulking gun. When correctly used, the urethane will bond the windshield, backlights, and sidelines to the vehicle frame, preventing moisture from entering these specific areas of the car.

After applying the primer, your technician “dry sets” your new windshield by lowering it into place and marking where it will sit. This helps ensure the installer can properly install your new windshield without shifting it around. This will save you time and money in the long run.

Lastly, the windshield will be installed using an automatic wiper system and a rubber gasket. After the windshield is in place, the molding and cowl will be reinstalled. The installer will clean up any broken glass or debris in and around your car.

Once your windshield is in place, it is important to wait an hour before driving your car. This is to allow the urethane to be fully cured. If you slam your doors or push too soon, the windshield could move and cause leaks and air noise. It could also interfere with your airbags if they deploy in an accident.

When we replace your windshield, you are guaranteed a quick and safe installation. This is because all of our technicians are trained to follow the process as outlined above. If you are having your windshield replaced by another shop, make sure they follow this procedure to ensure your safety and the quality of your repair.

As the technician places your new windshield, he will apply the necessary adhesive to ensure it stays in place. Once the glue dries, you can drive safely. This process typically takes 30 minutes to one hour.

Before placing your glass, your tech will clean the area to ensure it is clear. Then, I will remove any clips or parts that come in the way. This will include the rearview mirrors, windshield wipers, and other components attached to the windshield.

A professional will also cut the urethane seal around the perimeter of the frame using a long knife. This will minimize damage to the pinch weld, which is critical for a good seal.

After the windshield is set, your technician will install the new molding to hold the glass in place. They will also replace any clips or parts that came off during the removal process. Lastly, they will apply a bedding and glazing compound to seal the gap between the windshield and the vehicle frame.

It is important to remember that not all chips and cracks can be repaired. If your windshield has a crack directly in the driver’s line of sight or is old and covered with tiny divots, it may need to be replaced rather than repaired.

Finally, it is important to leave the car for a few hours after your windshield is installed. If you drive off before the adhesive can set, your windshield could shift and cause leaks or other problems. It is best to let a certified auto glass specialist do the job for you. If you attempt to replace your windshield yourself, you risk voiding your warranty and hurting your car or possibly injuring yourself.

Car Alarm Installation Essential Services

car alarm

Car alarms can help deter theft and break-ins by letting you know when someone is trying to get into your vehicle. Some of them also have LED lights that work to indicate an intrusion attempt.

Read your car’s manual to find the wiring layout and note which panels may need to be removed during installation. Be sure to disconnect the battery before starting your install.

1. Battery Replacement

Car alarms are a great way to protect your vehicle and its contents. The basic systems can tell when a door is ajar or a trunk is open, and more advanced ones have remotes that can communicate with your car to warn you of tampering. Some insurance providers will even offer premium discounts if you have an alarm installed.

While a factory car alarm may come with some of the features you’re looking for, aftermarket systems can provide more sophisticated features and customization options. A professional installation service can help you choose a system that meets your needs and budget.

A back-up battery provides power to your security system and helps prevent it from being silenced. It can be installed in your vehicle as an optional accessory and is a good idea for anyone who has a security system with a siren. The battery will maintain power to your alarm even if it has been disconnected from the vehicle’s main battery.

When changing your battery, make sure you wear a pair of work gloves and eye protection. Automotive batteries contain caustic liquid, and you don’t want to get any of it on your skin. Also, be careful not to connect the battery terminals directly. If you do, you could create a short circuit and cause your alarm to go off or fail to function.

Before installing a new battery, find a hole for the wires. Depending on the manual that comes with your alarm, this might mean finding an existing hole that wires pass through already, or drilling a new one. It is best to drill into a plastic or rubber section of the firewall, rather than the metal portion.

You’ll also need to disconnect the negative cable from the battery first. This is typically done with a wrench. Then, using insulated work gloves, you can remove the old battery. It is always a good idea to replace the battery with one that is of the same voltage as your original, as it will run more efficiently. When reinstalling the battery, be careful not to overtighten the bolt that holds the clamp to the battery terminal.

2. System Reset

Car alarms have come a long way in recent years, with manufacturers offering more advanced security systems on some of their models. These can even communicate with your smartphone to alert you of potential issues or disturbances. Choosing the right system will depend on the type of security you need and where you park your vehicle.

Basic car alarms will tell you when your doors are ajar, while complex ones can also detect when a trunk is open or if your hood or trunk lid have been opened. Some systems even have sensors that will trigger the siren if someone attempts to break into your vehicle by smashing the window or pulling the door handle.

Some systems are designed to prevent tampering with the ignition by adding a starter disable feature that will keep your car from starting unless you have the key fob with you or enter through the front passenger seat. Other alarms will monitor the vehicle’s gyroscope and accelerometer to determine whether it has been jacked up or otherwise moved. A digital tilt sensor is a great option to protect vehicles with upgraded wheels and tires.

A professional installer will be able to help you select the right alarm system for your vehicle. They will know how to properly install the system in your vehicle without causing any damage or interfering with any of its existing components. They will be able to provide you with tips and tricks that you can use at home for maintaining your alarm system in the future.

If you are planning on installing a car alarm at home, be sure to disconnect the battery before beginning any work. You will also need to disconnect any airbag wiring if you are working on a vehicle that has them. These wires are usually encased in yellow covers and connectors.

After you have disconnected the battery and other necessary parts, you will need to test your alarm system. First, you will need to locate the wire that will trigger the siren. This will probably be connected to the dome light or other sensors on your alarm. Next, you will need to connect it to the power wire of your alarm module. Be careful not to connect it to the power wire for your battery or any other constant power source that can cause a short circuit.

3. Wiring

Car alarm installation can seem like a daunting task, but it is something you can do yourself. Just take your time and read the manual carefully, follow the wiring instructions, and use a multimeter to check wires as you go. You will need to locate and tap into the various switches on your vehicle that control the siren and other features of your alarm. This will most likely involve removing the door panels to access the wires behind them. If your kit includes remote start you will also need to tap into the ignition harness. Use a manual to find the locations of these, as they will be different for each vehicle. Once you have located and tapped the proper wires, connect them to the alarm controller and follow the instructions for completing the install.

Many alarm systems include a proximity sensor and LED indicator that can be fitted to show when the alarm is active. It’s a good idea to fit them now as they will add to the security of your vehicle and prevent false alarms.

Some alarms will also add a starter disable feature that can be activated by pressing the button on the driver’s dome light switch. You will need to find a wire that leads to this switch (test the car with the key in the ignition) and then splice your starter kill wire into it. The instructions will indicate the correct color for this wire.

Some alarms have a shock sensor that will need mounting to a solid surface under the dash. You will also need to mount the control box and any relays that may be included in your kit. Once everything is plugged in, the final step is to test that it works properly. If you experience any problems, contact the manufacturer for support.

4. Testing

A car alarm is an electronic device that discourages theft of a vehicle or its contents. It works by emitting a high-volume sound (often a siren, klaxon, pre-recorded verbal warning, or the vehicle’s own horn) when it is triggered. Some systems also flash the headlights, send a signal to a remote paging system, and interrupt one or more electrical circuits that are required to start your engine.

Rochester, NY Aftermarket Car Security Systems

Although your car may already have some built-in security features, they probably aren’t enough to stop a determined thief or vandal. That’s why a professionally-installed Rochester, NY car alarm is the way to go. It’s not just louder than your car’s factory alarm; it also provides many other security features that will make break-in attempts a lot more difficult.

Your car alarm installation technician will help you choose a system that fits your needs. They can show you how different systems work and which ones have the most options for the best price. Many systems include a warranty that covers the cost of the system and the installation. Some even have guarantees that cover your insurance deductible in the event of a break-in while the system is armed.

The installer will splice the power wire to the control module through a hole in your vehicle’s dash and then run it along the passenger side of the dashboard to the battery. They will then mount the LED indicator, sensors, and other accessories. The installer will use double-stick tape to ensure that the components are secure. They will then run the sensors and siren wires to their respective locations and connect them in place. Finally, they will test the system using a multimeter to verify that it is working as expected. It is important to avoid using a test light, which can draw too much current and possibly damage your vehicle’s electronics.

After the installation is complete, your installer will remove any tools and parts from the vehicle. If you want, they can also test the alarms to make sure that they are working properly.

Navigation