Concrete Stonefacing

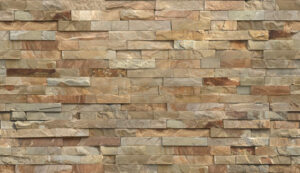
Concrete Stonefacing is an excellent alternative to complete masonry stone for walls near swimming pools and hot tubs. It’s moisture and temperature-resistant and can be installed on new block or wood-frame walls with wall ties.

Stonefacing

You’ll want to use a mortar with a low compressive strength compared to your masonry units for the best look. This will allow the mortar to absorb the stone’s texture.

Before installing stone veneer it is important to understand the surface preparation process. This is no different whether you are applying the stone to a block, poured concrete or wood-frame wall. For a wood-frame wall the proper support must be provided with a footing and the walls should be attached to the studs with either a powder actuated nail gun or masonry screws, and a weather resistant barrier such as a peel and stick roofing membrane or #30 felt paper must be applied to the exterior sheathing. If you are building a new wall or retrofitting an existing one, the walls must be reinforced with steel and the studs must be covered with a metal lath that is galvanized. The lath is then stapled to the studs with a staple gun using masonry nails.

The concrete or mortar used for stone facing must be mixed thoroughly and may need color added to create the desired look of natural stone. A water soluble release agent such as GlobMarble can be added to the concrete prior to pouring to help in the removal of the casting from the mold. Oxide pigments in a wide variety of earth tones such as brick reds, browns, ochers and umber are available and can be sprinkled and smudged into the wet concrete during mixing for a mottled appearance.

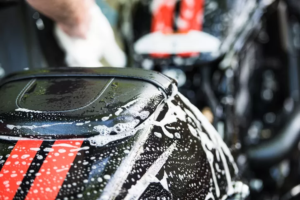
It is important not to apply too much pressure when setting the stones, as this can damage and weaken the cement. For a good bond, the back of each stone should be thoroughly dampened with clean water and then pressed into the scratch coat. Once the stone is set it is recommended to allow a few hours for curing before scratching the excess mortar from the back of the stone. Scratching too soon can smear the cement on the edges of the stone and compromise the integral structure of the mortar bed beneath it.

It is also very important not to attempt to clean any wet mortar dropped on installed stone until it is dry, as this can cause the wet mortar to spread and stain the stone. If you must remove any wet mortar before it dries, use a soft brush and masonry cleaner to remove any residue without damaging the stone.

Scratch Coat

When installing stone veneer you can often skip the use of a scratch coat on a block or cmu wall but if you are working on a concrete wall it is imperative. It may seem counterproductive to apply a thicker mud to the surface you are going to cover with stone but it helps in the long run by ensuring your veneer stones stick. It is also a great way to roughen up the surface which will make the brown coat application of your overlayment much easier.

The texture of the scratch coat creates a mechanical key that allows the subsequent brown coats (or plaster, mortar or concrete) to lock into it, creating a stronger bond. In addition, some types of scratch coats can help in the chemical bonding process by including additives or bonding agents that will react with the brown coat and allow a stronger adhesion between them.

Before the scratch coat has been applied it is important to wet down the wall and let it settle for a few minutes. Then you can begin to trowel it on or spray it on, whichever is easiest for your installation. Be sure to maintain a 3/8″ thick coat throughout the entire process.

This is the time to add color if you wish, dry pigment powders are available in many earth tones and can be added to the mix a little at a time. The more you add the more intense or variegated your color will become.

For a more uniform color, you can back butter the stone to build a bond coat. This is done by placing a dollop of mortar on the back side of the stone i.e. the side that will be pressed into the scratch coat. It is important to back butter all the corners of the stone as well.

When you are finished laying out your stone, take the opportunity to inspect each piece for size, shape and color to ensure a consistent pattern for your installation. It is also a good idea to try and stagger the corner pieces slightly in order to avoid long unbroken lines that can draw attention to themselves.

Metal Lath

Metal lath is a lightweight base to support plaster or stone veneer applications over a wall, soffit or ceiling. It is available in a wide variety of configurations such as self-furring expanded dimpled metal lath, flat-ribbed and wire mesh to meet project requirements and plaster/stucco preferences. It consists of a sheet of metal that has been slit and expanded into numerous diamond openings to provide an irregular surface for the keying of plaster or stucco. Without this type of surface, plaster and/or stucco would crack under the types of stress and deflation that occur throughout construction and residential living.

For framed exterior walls, a moisture control barrier should be applied over the sheathing before applying the metal lath. Once the lath is installed, it should be fastened using galvanized staples or nails 6 inches on center vertically and 16 inches on center horizontally, making sure to penetrate the studs at least 1 inch. For interior framed walls, a paper-backed version of the metal lath can be used to eliminate the need for a separate moisture control barrier, which may help reduce installation time.

During the lath process, a scratch coat is also applied to the wall using a mixture of 1 part type S masonry cement to 2.5 parts sand. This mixture is dry mixed and stirred thoroughly to avoid clumps. Water is then added a little at a time, mixing until it is the consistency of a paste.

If desired, dry pigment can be added to the mix prior to pouring concrete for a colored concrete wall. This allows for a mottled look to the finished product. Pigments are available in a wide array of earth tones – brick reds, browns, ochers and umber. They can be sprinkled and smudged onto the mold during mixing for a random look or they can be hand rubbed in with a rag. For a textured finish, the surface of the molded concrete can be scored with a wire brush before drying. This will cause the concrete to roughen up a bit and allow for the mortar to grip better.

Veneer Placement

When it comes to stone veneer installations, there are many factors that come into play. Some of them, like building codes and material selections, are mandated by your local government. Others, however, are more in the realm of professional judgment. For example, whether to use a wet or dry installation process or to use a weather resistant barrier and other detailing. While these details may seem minor, they can make the difference between a successful and problematic project.

Manufactured stone veneer (MSV) is a popular choice for homeowners and builders looking to add a natural aesthetic to their home without breaking the bank on full-scale stones. As such, this type of product must be installed properly for its long-term performance and durability.

To ensure a proper install, it is important to begin the project with a moisture barrier, even if you are installing on a concrete or masonry wall. In this case, the barrier should be applied to the sheathing or cladding of the wall rather than directly to the studs. This detail allows for a drainage plane and prevents moisture from soaking into the wood framing of the home, which can lead to rot and mold issues.

Once the sheathing is prepared, if you are using metal lath, a scratch coat should be applied. This is necessary to allow the mortar to grab onto the lath and provide a strong bond. This will also help eliminate the potential for unsightly sagging and other issues that can result from a direct installation on a wood frame.

When it comes time to begin placing the stone veneer, it is important that you do a “dry layout” before applying the actual mortar. This will allow you to determine how much stone you need and to check that the pieces are evenly sized. It is also a good opportunity to test your dry-stacking skills and ensure that you can create tight, natural-looking joints between the stones.

During the dry layout, it is important to pay attention to the color of the stone and make sure that there are no areas where the mortar will be visible between the pieces of veneer. If this is not the case, you will need to back butter the stone to build a bond and hide the mortar. Back buttering is an easy step that will ensure a clean, finished look for your stone veneer.

Motorcycle Detailing is a Deeply Satisfying and Almost Meditative Experience

Motorcycle Detailing Perth is a deeply satisfying and almost meditative experience for those with patience and a precise eye. Detailing a motorcycle can significantly extend the life of plastic, leather, vinyl components, paint, and chrome surfaces.

Several factors affect how long it takes to detail a motorcycle. These include the bike type, its cleanliness level, and how much time is available.

Motorcycle enthusiasts are passionate about their bikes and often take pride in keeping them looking like they came out of the showroom. Detailing isn’t just a process that takes time and patience; it can also be deeply satisfying. Detailing a bike can also reveal any loose or broken components that need to be replaced, which can help keep the motorcycle running in top condition.

When detailing a bike, the first step is to find a clean and shaded area for working. This not only allows the operator to work in comfort but also prevents the detergents and cleaners from drying up or leaving behind a film or residue. The operator must also cover any vulnerable components, and they should remove the seat before starting motorcycle detailing.

Next, a hose is used to rinse down the entire surface of the motorcycle. Depending on the severity of dirt and grime present, this can be a powerful stream or a gentler spray. For extremely dirty bikes, an electric pressure washer with 1300 to 1900 psi can shorten cleaning times and eliminate the need to scrub with soaps and brushes.

While rinsing the bike, the professional motorcycle detailer will pay special attention to the wheels and suspension. This is because the high-pressure water can damage these parts. Once the wheels and suspension are rinsed, the motorcycle is ready for the washing phase of the detailing process.

A mild detailing spray is applied to the paint and chrome surfaces during the wash stage. The spray acts as a lubricant and helps the motorcycle’s clay bar glide over the surface without scratching it. The professional will use a safe clay bar for the specific type of bike and follow the manufacturer’s instructions carefully.

After the clay bar is removed and the bike is rinsed, a motorcycle detailer will use a wax suitable for the paint type and finish. This protects the paint and chrome from damage and keeps it shinier for longer. A good quality wax will last for up to two seasons before it needs to be reapplied.

If a motorcycle is dirty, it may need more than just a basic wash. A degreaser may be required to break down stubborn grease or oil. This cleaning product usually comes in a foam formulation and needs to be sprayed on and left for a few minutes before being removed with a clean cloth. It’s easy to find professional quality products designed specifically for motorcycles. Many people also have homemade green degreaser recipes they like to use.

After washing the bike, it’s important to dry all areas thoroughly. If not done properly, it’s very easy for water to get into places where it shouldn’t and cause damage. This includes the engine and pipes, where a sudden temperature change could cause permanent damage. The Perspex windshield often collects water droplets, and it’s important to remember when drying. This can be avoided using a product such as Crystal Glass Cleaner, which contains mild distilled solvents that quickly cut through grit and grime and flash it away to leave a sparkling finish.

Most professional detailers will use a large stack of clean microfiber towels to wipe the bike down. This material is perfect for drying motorcycles because loads of tiny fibers crammed together give each towel a massive surface area to wick away the water. Once everything is dried, it’s time to get down to the serious business of motorcycle detailing.

When cleaning and polishing, the professionals know it’s not just about making the bike look beautiful. The engine is the heart of the motorcycle, requiring special attention to prevent problems. Dirty and gummed-up engine parts can cause poor performance and even stop the engine from running. This is why professional detailers often use an engine brightener, which breaks down deposits and makes the engine look new again.

Motorcycle detailers might also use professional products, including bug/insect remover, which helps break down pest remains before they can cause damage. They might also use a clay bar to help deliver a smooth glass paint finish.

Motorcycles are built from a lot of metal and chrome. They are always exposed to nature’s elements and need special care to keep them looking shiny and clean. Motorcycle polishes are designed to do just that. They are usually light abrasives that gently strip away the oxidation, leaving the fresh metal underneath – essentially cleaning and polishing in one step. A quality polish will also leave a very slight film that helps protect the metal, making it more resistant to oxidation in the future.

The dirt on a motorcycle will affect how much work it takes to get it clean. A very dirty bike may require a heavy-duty degreaser to break down the contaminants and allow you to scrub them off without damaging the paintwork. You can make your homemade degreaser or buy a commercial product that does the job in just a few minutes.

After washing, many detailing professionals will use a motorcycle dryer to remove all the excess water and speed up the drying process. This is especially helpful on the paintwork and chrome. A good air blaster blows warm, dry, filtered air to dry a motorbike quickly. It gets into the smallest crevices and can help you reach areas that are hard to get at with a towel.

A good spray wax can help to protect a bike from the elements and maintain that glossy, mirror-like finish. It’s important to use a good quality spray wax that contains no silicones, which can damage the paintwork. You can also use a ceramic spray that gives a high-gloss finish to painted surfaces and makes them easier to wipe down, just like a coat of clear wax.

If your pride and joy is a chrome motorcycle, you’ll want to use a dedicated chrome polish. This will remove fingerprints, smudges, and bugs from the chrome parts on your bike. You can even use this on the exhaust, making it look new again. It’s also easy to use; pour some onto a microfiber towel and buff it on the chrome parts of your motorcycle.

The last step in a thorough motorcycle detailing process is to apply a sealant or wax on your bike’s paint and chrome surfaces. This protects your hard work from the elements and gives your motorcycle a deep shine. It also protects your bike from future stains and makes it easier to wipe off any dust or dirt that may have settled on the surface. This is necessary for riders who want to keep their bike in top condition between rides.

When choosing a place that offers motorcycle detailing, it is important to determine how much their services cost. This will help you determine if the place is within your budget and can provide you with the care you need. You will also want to ensure that the motorcycle detailer is reputable and has a good track record of delivering quality work. It is always a good idea to check out any reviews or testimonials from previous customers on the internet.

After washing your bike, be sure to rinse it thoroughly. If you wait too long to rinse, the soap will dry onto your bike and cause streaks. Also, scrub the wheels and other hard-to-reach parts of your bike with a soft brush to eliminate the dirt accumulating in these areas. Lastly, clean and rinse your sponges regularly so you don’t transfer dirt from your dirty sponge to your bike.

Liquid cleaners can speed up the cleaning process and save time, but they should be used carefully. Spraying a liquid cleaner on your motorcycle’s surface can quickly remove oil marks, tar, and dirt. If you do this, use a rag free of scratches.

Once your motorcycle is completely cleaned and dry, applying some lubricant on the chain is a good idea since the soap and water will likely have washed away some of it. This will keep the chain rust-free and reduce wear on the tires. You can add some lubricant to your other rubber components, like the grips and saddlebags.

How Windshield Replacement Installation Works

Many modern cars have cameras and sensors behind the windshield that enable features like lane-keeping assistance, adaptive cruise control, and collision prevention. These sensors and cameras need to be recalibrated after windshield repair or replacement.

This is an easy step to miss and one that some technicians skip. Windshield Replacement In Ocala applies a urethane primer to the pinch weld and frame perimeter.

windshield repair

When a crack or chip in your windshield occurs, it must be repaired immediately. Left unattended, these small blemishes can expand to form “spider web”-like cracks that compromise the structural integrity of your vehicle and can impair your driving visibility.

Windshield replacement is a complicated process that requires professional installation to ensure your safety and the quality of the new glass. It’s important to choose a reputable auto shop and a glass that is certified by the Department of Transportation (DOT) as meeting federal standards for safety glass. It’s also a good idea to insist that your installer use OEM or original equipment equivalent auto glass rather than aftermarket window glass.

Before a technician can install your new windshield, they must prepare the area and remove any existing adhesive or sealant holding it in place. Once the frame is empty, a primer is applied to provide a clean surface for the urethane adhesive to adhere.

Once the primer is dry, the technicians will apply a bead of urethane to the perimeter of the frame, making sure it’s level and continuous. Then, the windshield is set into place using suction cup window holders.

If your car has ADAS, such as cameras that detect lane departures or forward collision risks, ask your installer to recalibrate those sensors when the new windshield is installed. If not properly calibrated, these systems can react too quickly or fail to warn you of dangers that are actually present. This can lead to dangerous road conditions or even accidents. This is an important step that most professional automotive body shops will perform for you.

If your windshield is cracked or damaged, it may be time for a replacement. While small chips or dings can be repaired, larger cracks or spider-web damage that compromises your vision require a full replacement. Once the technician assesses the damage and determines if it needs repair or replacement, he will begin the removal process by covering the vehicle’s exterior with protective tape and placing towels on the dashboard and over the hood to protect against possible glass shards during the replacement.

Once the protective tape and towels are in place, the technician will start by removing the rearview mirror and windshield wipers, as well as the rubber gasket around the base of the windshield. Then, he will use suction cups to remove the old windshield and set it aside.

This is one of the most important steps of the entire process. We know that if this step is skipped, it will result in rust underneath the new urethane, which can cause leaks and other problems.

During this step, the technician will also be able to see if the windshield has any water leaks or damage from the pinch weld (an area on the front of the car where different metal components are welded together for structure). This can cause ghosting or double images when driving in certain conditions.

Then, the technicians will start to prepare the new glass for installation. This includes cutting it to size and removing garnish moldings attached to the glass. This is an extremely important part of the replacement as it ensures that the new windshield is properly fitted and will be a perfect fit for your vehicle.

A primer is a base coat for paint. It provides a smooth surface for the color to bond to and blocks any imperfections in the original coating. Primer also helps protect the surface from moisture and stains. There are different primers for different needs. For example, some are water-based, while others are oil-based. Some are formulated for interior or exterior use. Some primers emit dangerous fumes, so it’s important to wear a mask when using them.

When a new windshield is installed, technicians will apply a primer to both the glass and the vehicle’s frame. They do this to ensure zero contamination before sticking the windshield, adding a layer of protection against the elements.

If this step is skipped, the windshield could crack. A cracked windshield is a safety hazard, especially when driving on the highway. Loose debris from the road, like gravel or rocks, can fly off the car and slam against your windshield at high speeds.

In addition, a poorly installed windshield may affect your vehicle’s sensors. If you have advanced driver assistance systems (ADAS), such as lane departure warnings or blind spot monitoring, a cracked windshield can throw off the calibration. This could leave you vulnerable to a collision or in the wrong lane.

Once the technician has applied the primer and your new windshield is firmly set, they’ll dry it and let it sit for a few hours. It’s best to keep your car out of the rain until the adhesive has fully cured, which can take up to a day. You should also avoid slamming the doors while the windshield is still healing, as it can dislodge the window.

Urethane is a tough, flexible polymer-based adhesive in the auto glass industry. It is also found as a coating, sealant, and thermal insulation material. It is black and has a medium viscosity, easily applied with an electric or air-powered caulking gun. When correctly used, the urethane will bond the windshield, backlights, and sidelines to the vehicle frame, preventing moisture from entering these specific areas of the car.

After applying the primer, your technician “dry sets” your new windshield by lowering it into place and marking where it will sit. This helps ensure the installer can properly install your new windshield without shifting it around. This will save you time and money in the long run.

Lastly, the windshield will be installed using an automatic wiper system and a rubber gasket. After the windshield is in place, the molding and cowl will be reinstalled. The installer will clean up any broken glass or debris in and around your car.

Once your windshield is in place, it is important to wait an hour before driving your car. This is to allow the urethane to be fully cured. If you slam your doors or push too soon, the windshield could move and cause leaks and air noise. It could also interfere with your airbags if they deploy in an accident.

When we replace your windshield, you are guaranteed a quick and safe installation. This is because all of our technicians are trained to follow the process as outlined above. If you are having your windshield replaced by another shop, make sure they follow this procedure to ensure your safety and the quality of your repair.

As the technician places your new windshield, he will apply the necessary adhesive to ensure it stays in place. Once the glue dries, you can drive safely. This process typically takes 30 minutes to one hour.

Before placing your glass, your tech will clean the area to ensure it is clear. Then, I will remove any clips or parts that come in the way. This will include the rearview mirrors, windshield wipers, and other components attached to the windshield.

A professional will also cut the urethane seal around the perimeter of the frame using a long knife. This will minimize damage to the pinch weld, which is critical for a good seal.

After the windshield is set, your technician will install the new molding to hold the glass in place. They will also replace any clips or parts that came off during the removal process. Lastly, they will apply a bedding and glazing compound to seal the gap between the windshield and the vehicle frame.

It is important to remember that not all chips and cracks can be repaired. If your windshield has a crack directly in the driver’s line of sight or is old and covered with tiny divots, it may need to be replaced rather than repaired.

Finally, it is important to leave the car for a few hours after your windshield is installed. If you drive off before the adhesive can set, your windshield could shift and cause leaks or other problems. It is best to let a certified auto glass specialist do the job for you. If you attempt to replace your windshield yourself, you risk voiding your warranty and hurting your car or possibly injuring yourself.

Car Alarm Installation Essential Services

car alarm

Car alarms can help deter theft and break-ins by letting you know when someone is trying to get into your vehicle. Some of them also have LED lights that work to indicate an intrusion attempt.

Read your car’s manual to find the wiring layout and note which panels may need to be removed during installation. Be sure to disconnect the battery before starting your install.

1. Battery Replacement

Car alarms are a great way to protect your vehicle and its contents. The basic systems can tell when a door is ajar or a trunk is open, and more advanced ones have remotes that can communicate with your car to warn you of tampering. Some insurance providers will even offer premium discounts if you have an alarm installed.

While a factory car alarm may come with some of the features you’re looking for, aftermarket systems can provide more sophisticated features and customization options. A professional installation service can help you choose a system that meets your needs and budget.

A back-up battery provides power to your security system and helps prevent it from being silenced. It can be installed in your vehicle as an optional accessory and is a good idea for anyone who has a security system with a siren. The battery will maintain power to your alarm even if it has been disconnected from the vehicle’s main battery.

When changing your battery, make sure you wear a pair of work gloves and eye protection. Automotive batteries contain caustic liquid, and you don’t want to get any of it on your skin. Also, be careful not to connect the battery terminals directly. If you do, you could create a short circuit and cause your alarm to go off or fail to function.

Before installing a new battery, find a hole for the wires. Depending on the manual that comes with your alarm, this might mean finding an existing hole that wires pass through already, or drilling a new one. It is best to drill into a plastic or rubber section of the firewall, rather than the metal portion.

You’ll also need to disconnect the negative cable from the battery first. This is typically done with a wrench. Then, using insulated work gloves, you can remove the old battery. It is always a good idea to replace the battery with one that is of the same voltage as your original, as it will run more efficiently. When reinstalling the battery, be careful not to overtighten the bolt that holds the clamp to the battery terminal.

2. System Reset

Car alarms have come a long way in recent years, with manufacturers offering more advanced security systems on some of their models. These can even communicate with your smartphone to alert you of potential issues or disturbances. Choosing the right system will depend on the type of security you need and where you park your vehicle.

Basic car alarms will tell you when your doors are ajar, while complex ones can also detect when a trunk is open or if your hood or trunk lid have been opened. Some systems even have sensors that will trigger the siren if someone attempts to break into your vehicle by smashing the window or pulling the door handle.

Some systems are designed to prevent tampering with the ignition by adding a starter disable feature that will keep your car from starting unless you have the key fob with you or enter through the front passenger seat. Other alarms will monitor the vehicle’s gyroscope and accelerometer to determine whether it has been jacked up or otherwise moved. A digital tilt sensor is a great option to protect vehicles with upgraded wheels and tires.

A professional installer will be able to help you select the right alarm system for your vehicle. They will know how to properly install the system in your vehicle without causing any damage or interfering with any of its existing components. They will be able to provide you with tips and tricks that you can use at home for maintaining your alarm system in the future.

If you are planning on installing a car alarm at home, be sure to disconnect the battery before beginning any work. You will also need to disconnect any airbag wiring if you are working on a vehicle that has them. These wires are usually encased in yellow covers and connectors.

After you have disconnected the battery and other necessary parts, you will need to test your alarm system. First, you will need to locate the wire that will trigger the siren. This will probably be connected to the dome light or other sensors on your alarm. Next, you will need to connect it to the power wire of your alarm module. Be careful not to connect it to the power wire for your battery or any other constant power source that can cause a short circuit.

3. Wiring

Car alarm installation can seem like a daunting task, but it is something you can do yourself. Just take your time and read the manual carefully, follow the wiring instructions, and use a multimeter to check wires as you go. You will need to locate and tap into the various switches on your vehicle that control the siren and other features of your alarm. This will most likely involve removing the door panels to access the wires behind them. If your kit includes remote start you will also need to tap into the ignition harness. Use a manual to find the locations of these, as they will be different for each vehicle. Once you have located and tapped the proper wires, connect them to the alarm controller and follow the instructions for completing the install.

Many alarm systems include a proximity sensor and LED indicator that can be fitted to show when the alarm is active. It’s a good idea to fit them now as they will add to the security of your vehicle and prevent false alarms.

Some alarms will also add a starter disable feature that can be activated by pressing the button on the driver’s dome light switch. You will need to find a wire that leads to this switch (test the car with the key in the ignition) and then splice your starter kill wire into it. The instructions will indicate the correct color for this wire.

Some alarms have a shock sensor that will need mounting to a solid surface under the dash. You will also need to mount the control box and any relays that may be included in your kit. Once everything is plugged in, the final step is to test that it works properly. If you experience any problems, contact the manufacturer for support.

4. Testing

A car alarm is an electronic device that discourages theft of a vehicle or its contents. It works by emitting a high-volume sound (often a siren, klaxon, pre-recorded verbal warning, or the vehicle’s own horn) when it is triggered. Some systems also flash the headlights, send a signal to a remote paging system, and interrupt one or more electrical circuits that are required to start your engine.

Rochester, NY Aftermarket Car Security Systems

Although your car may already have some built-in security features, they probably aren’t enough to stop a determined thief or vandal. That’s why a professionally-installed Rochester, NY car alarm is the way to go. It’s not just louder than your car’s factory alarm; it also provides many other security features that will make break-in attempts a lot more difficult.

Your car alarm installation technician will help you choose a system that fits your needs. They can show you how different systems work and which ones have the most options for the best price. Many systems include a warranty that covers the cost of the system and the installation. Some even have guarantees that cover your insurance deductible in the event of a break-in while the system is armed.

The installer will splice the power wire to the control module through a hole in your vehicle’s dash and then run it along the passenger side of the dashboard to the battery. They will then mount the LED indicator, sensors, and other accessories. The installer will use double-stick tape to ensure that the components are secure. They will then run the sensors and siren wires to their respective locations and connect them in place. Finally, they will test the system using a multimeter to verify that it is working as expected. It is important to avoid using a test light, which can draw too much current and possibly damage your vehicle’s electronics.

After the installation is complete, your installer will remove any tools and parts from the vehicle. If you want, they can also test the alarms to make sure that they are working properly.

Navigation